Simple Timers for Dethermalizers

One of the bittersweet joys in model aviation is an out-of-sight flight by a Free Flight model.

While we all strive for our models to fly as well as we can, it is possible to have a model fly too well. Well trimmed, and with a bit of luck, a model may catch a thermal and climb to beyond the limits of our vision. It is the purpose of a dethermalizer to affect a change in the geometry of a model, such that it descends more rapidly, yet still safely. Getting the DT to activate after a target time is the job of a DT timer.

Many designs have been used over the years, but current trends for simple single function timers have given us both the Tomy timer - modified from wind-up toys - and the Silly Putty timer, which makes use of that ever so popular gooey plastic substance sold in a plastic egg. Both are detailed below.


The Silly Putty Timer

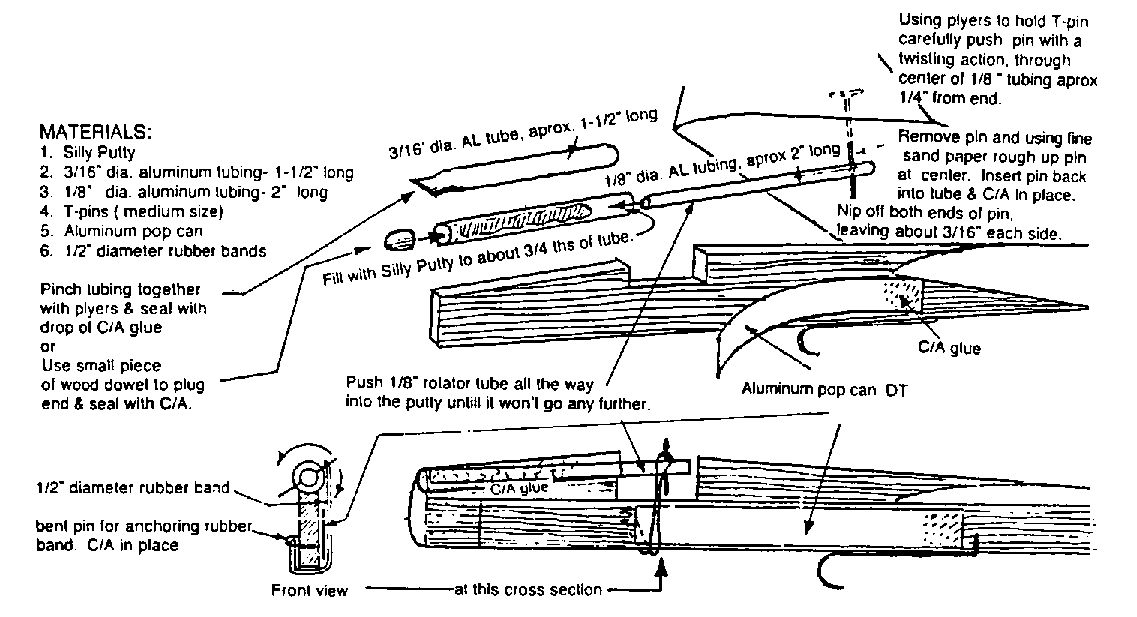
The Silly Putty Timer is a design of Hap McDaniels as described by John Delagrange in the August/September 1996 NFFS Digest. The timer is shown installed permanently on a catapult or HLG, though is easily adaptable to other types of FF models as well. Note that the timer will run for different durations based on ambient temperatures. Be sure to check the timer a couple of times to determine how many turns it takes to achieve a 2-2.5 minute run. Note the variations of length and diameter shown. Experimentation will help fine-tune the performance you need.

(click below image to view a larger version)


Tomy Timers

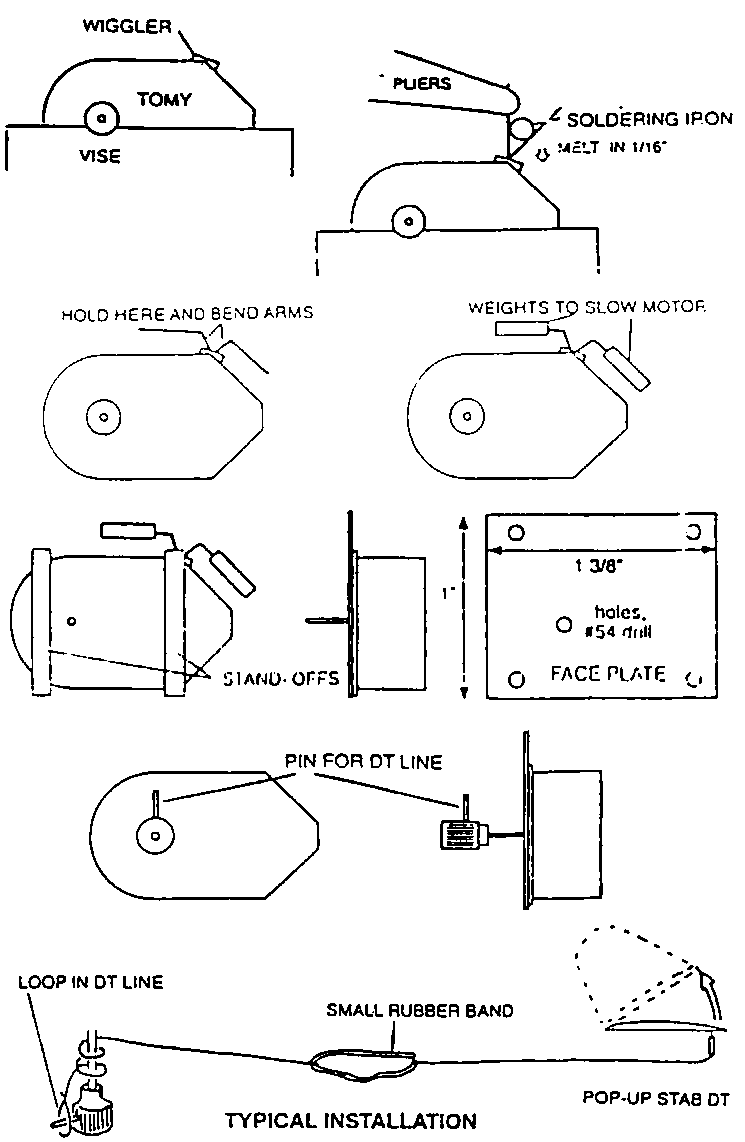
I believe this version of a Tomy Timer is originally a Don Srull design. The images are pretty much self explanatory, so I will just paraphrase the article. After carefully removing the guts from your favorite wind-up toy ....
  1. Cut a 1.5" length of .025" music wire & bend it into a sharp 45 degree "V".

  2. Place the tomy gently in a vice with the wiggler up. Hold the "V" with needle nose pliers, and centered on the wiggler. Using a soldering iron of about 30 watts, gently melt the "V" into the wiggler about 1/16".

  3. Grab the arms of the "V" with the needle nose pliers and carefully bend them down as shown above.

  4. Using thick cyano, glue 1/8 x 1/32 balsa stand offs to the motor face. Cut a face plate from 1/64 ply. Holding the winding shaft firmly with pliers, twist off the winding knob. Glue the face plate on with thick cyano.

  5. A short pin inserted into the winding knob will allow a simple means of attaching the DT line. Drill a small hole slightly undersized, then press in a short piece of .025 or 1/32 wire. Secure with a drop of thick cyano inserted into the hole before the wire. Cut the winder shaft so that it is about 3/8 above the face plate. Press the knob back onto the shaft, remembering to back up the opposite end of the shaft against a hard surface.

  6. Rig up an on-off switch with a small piece of thin wire that touches the wiggler in the off position, and moves free in the on position. Others prefer a switch made of a removable pin attached to a bright streamer.

  7. Install the timer in the model with the long dimension horizontal for best reliability. To operate the timer, wind fully, then hook up the DT line (with a small loop in the end of it) to the pin in the winding knob. Wind the string around the timer shaft the appropriate number of turns to get the desired DT time interval. Times up to 4-5 minutes should be attainable from such timers.

  8. As a final note, some timers have a slip clutch on the winding shaft so that the spring can not be overwound. If you use a timer with a slip clutch, do not lube it as this can hasten clutch failure. Motors without clutches can be lubed with water-like teflon-based lubes such as Slip-It.

    Experiment, and enjoy

(click below image to view a larger version)

return


Copyright 1998-2016, Thayer Syme. All rights reserved